This article was written by Jill Davis. It uses some methods developed by Stacy Boatman. With her permission and help, we've included her concepts and experiences. Shop the entire Scrapbook.com store for all your paper needs!
Materials Needed
Container(s) and a label maker to label the containers.
The Challenge
To set up a system that will help you keep paper scraps organized and usable. To de-junk and sort your scraps, and get those you keep into that system.
Introduction
I used to have several boxes of scraps (paper, ribbon, and other surplus supplies) in my closet. If I needed a scrap, I’d dig through the top two inches of the boxes and usually end up frustrated. I’d leave the mess, go to my shelves and choose a full sheet of paper, or a larger piece of ribbon to finish my project.
When the project was completed I’d toss those scraps into one of the boxes (my system); I’d feel guilt, and the cycle continued. I fooled myself into thinking the kids would use what was in the boxes, which they didn’t, and I rarely did anything meaningful with them either. I had no functioning system and kept the full boxes because I didn’t want to be wasteful, and I didn’t want to recycle them - “just in case” I needed something someday. I had clutter, no idea what to do about it, and scrap guilt! Sound Familiar?
The guilt came primarily because I let it, but also because I’d paid for perfectly good materials and I didn’t want to waste them. Interestingly, once I figured out how to store my scraps, and cleared out the clutter, good things happened.
I became more resourceful with my consumable supplies, more aware of how I could cut paper and ribbon, and I recycled more. And, instead of seeing scraps of paper, leftover paint, bits of ribbon, or “mistakes,” as something to feel bad about, I accepted them as part of the creative process. I also started going through my scraps first when I started a layout. Guilt is now gone and my creativity flows abundantly.
Whether you have stacks, piles, or boxes and drawers full of scraps (you may or may not use someday), I promise, it feels absolutely wonderful to make a plan and tackle the clutter once and for all. Hopefully, my story, and the tips and ideas shared here will motivate you to completely handle this area of your space.
It’s time to get honest and answer some exploratory questions. First, is the way your scraps are organized and contained really working for you? Second, do you actually use your scraps, or is scrap guilt making you keep things you don’t need? Finally, do you want or need something better?
If you honestly USE your scraps, then chances are you have a system that works, and you should probably focus on organizing something else. But, if you NEVER touch your stash, except to move it when it’s in your way, then think seriously about donating everything to a teacher or charity now, or recycling your scraps. Then, establish a system to recycle or donate on a regular basis to keep your stash at a minimum.
If you WANT to use your scraps, then you need to decide what to keep and what to get rid of. What constitutes a scrap to you anyway? Here’s where you need to establish the “rules” that will govern your scraps.
Step 1: Create Your Boundaries
For Stacy, anything less than 12 x 12 is a scrap (she’s a 12 x 12 scrapbooker). All scraps that are smaller, 8.5 x 11 papers, 8 x 8 papers, etc. go into her scrap drawers, so she has quite a large collection of scraps. The smallest paper she keeps in her system is 2 x 2 because she rarely uses anything smaller.
If a paper is smaller than 2 x 2 it immediately goes into a donation box or her recycling bin. You, however, might use smaller pieces, so decide where to draw the line on what to keep versus what to toss, and stick to it! In my system, I can keep any size of scrap I want as long as it fits into its assigned container (more details about that below).
Step 2: Decide on Your Storage Method
The most common way is by color, e.g., ROY. G. BIV and other papers you use regularly (vintage, florals, textures, etc.). You can also sort scraps by size, or intended use—like rectangles for photo mats, or strips for borders.
Step 3: Sort Scraps
Sort through all of your scraps to find what to keep and what needs to be gone according to your new boundaries. Here’s a good way to sort:
- Place all scraps on a large work surface. If they’re not all in one place, take time to gather them up and bring them to this place.
- Sort this pile into smaller piles by color, shape, or whatever system you chose. While you’re sorting, toss anything that’s bent, too small to use, torn, or ugly. If scraps are in odd shapes, trim them so that they’re in a more usable form.
- Take a good look at your pile sizes. Keep this image in your head as you check out the list of possible storage solutions below. You’re going to look for a containment system that can hold your piles (including future growth), and one that works with your scrapping style, room décor, and available space.
Following are some container options for scraps. Check them out and see if there’s one that will serve your needs.
Scrap Paper Container Possibilities
- Hanging files in a mobile cart or filing cabinet
- Vertical organizers
- 3-drawer wooden chest units
- 3 Ring Binder with page protectors
- Expandable file folders
- Multi-bin literature sorters
- Desktop files
- Retrospect Paper and Accessory Organizer
- Envelopes - choose the size based on your pile, and store upright in pretty bins or baskets.
- Map chest or drawers for larger collections
- 3-drawer plastic units, in 12 x 12 or 8.5 x 11 - these are stackable as well, which makes it easy to have one color per drawer
- The Totally Tiffany/ScrapRack System
Stacy stores her scraps in a map chest with drawers. She has two color groups of scraps inside each drawer, with the bottom drawer holding all of her multi-colored scraps. In each drawer the scraps are divided by size into shallow bins. In the larger bins (from the Container Store) she stores large paper scraps. In front of these bins are long, skinny border strips. In the middle, two smaller bins hold 2 x 4 scraps. In front of these middle bins are photo mats.
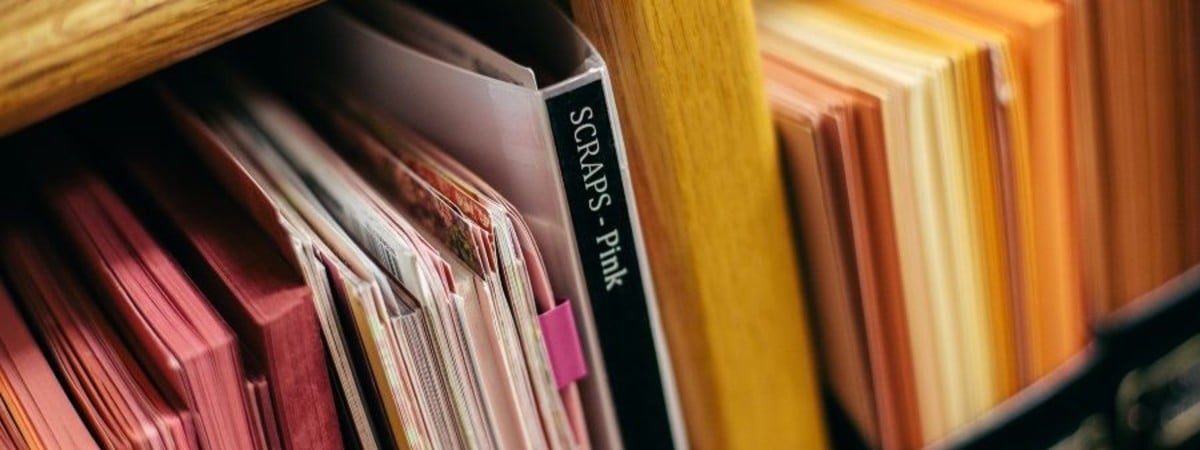
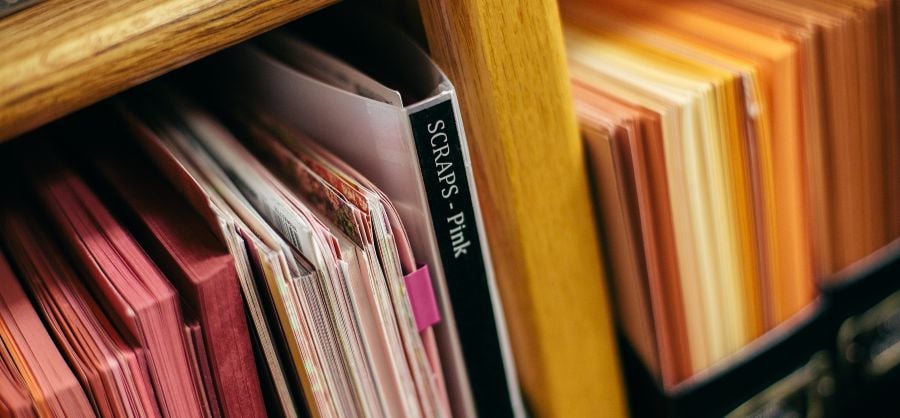
I use labeled Paper Pouches for my scraps, which are organized in ROY G. BIV order with a few other categories. These pouches work perfectly with my cardstock and paper system because they fit inside the Cropper Hopper Paper Holders I use to contain my cardstock and paper. It’s a simple system that works with how I think and move in my space – things are positioned so they work together so I don’t have to look in multiple places in my studio.
For example: If I need to make a green mat for a layout, I first check my green scrap bin for a color and size that will work. If there’s nothing there, I stay in the green Paper Holder (where the scrap bin is) to look for a full sheet of green paper to use. Everything I need is in the same place, and scraps are just as important, accessible, and usable in my work as a full sheet of paper.
My red scraps (patterns and cardstocks) go into the pouch labeled, “SCRAPS – Red” which goes inside the Paper Holder containing full-sheets of red cardstock and paper. Other colors of scraps go into their respective pouches inside Paper Holders in my themed paper area.
The difference here is the Paper Pouch is on the shelf next to the Paper Holder because I want room for more sheets of paper. The rule is that it doesn’t matter what size scrap I save, if I love it, think I will use it, and it fits into the pouch, I can keep it. If not, it goes into a small box I give to my grandkids' teachers. If they don’t need them when the box is full, I recycle.
The size of the container is non-negotiable; it can’t be replaced with a larger container. The system is easy to maintain because it takes me less than two minutes to process when the pouch is full. I dump the contents out onto my workspace, purge them into two piles (keep and donate) and put the cleaned out bin and sorted contents back into its “home.” The other pile goes into the donate box in the garage.
I have a rule that any and every system in my studio has to be easy to retrieve things from, and then put away. This system supports that goal.
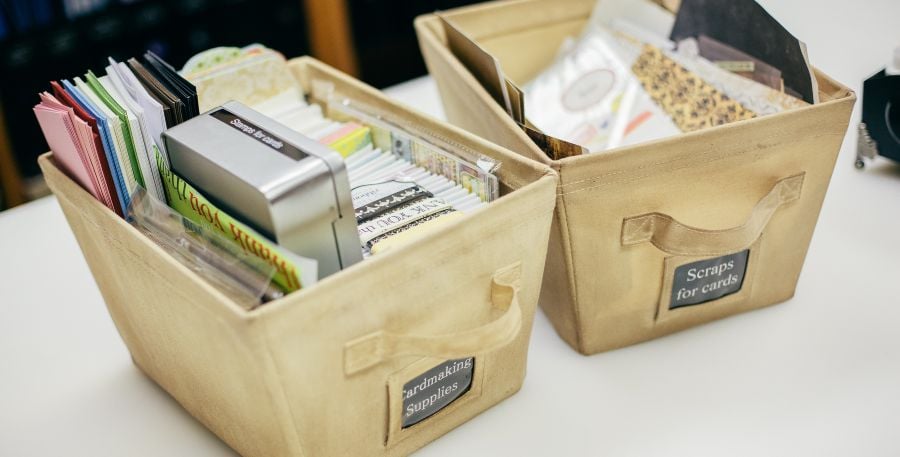
I also have card making bins. One is home to card kits with envelopes and the other is where I keep fun paper scraps big (and good) enough to become a card or card front. They are no larger than 4.5 x 11. The scraps in the second bin are also used to help me come up with new color and pattern combinations.
When I want to make a card from scratch, or want to challenge myself to do something new on a layout, I dump the scraps from this bin onto my work space to see what interesting and usable combinations of color and pattern show up amid the stash.
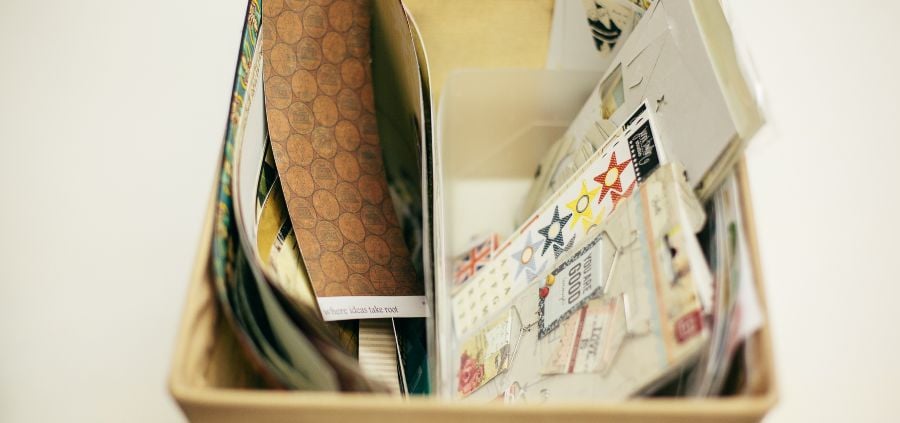
The last part of my scrap organization is a bin for borders. I like to use borders as “anchors” in my layouts, so I needed to have one place to go to look for what I needed. Any patterned paper, border embellishment left over from a collection, scrap ribbon longer than 6 inches, or anything else that can become a border goes into this bin, digger-style. I purge it from time to time to keep clutter at bay.
More Insight
Scraps happen! They’re a realistic part of our amazing art form. In order to diminish the stress that can come from out-of-control scraps, we need to have a system for how, and if, we contain and store them. If you’re a digger, having a one drawer, box, or bin of scraps is an ideal option—as long as you go to this place first to find what you need.
If you want to “find what you need quickly,” organize your scraps by color in assigned bins. No matter the method you choose, try to keep it compatible with the system you set up for your cardstock and patterned papers and try to keep these systems in the same area of your studio. When you do, both systems will flow together and make scrapbooking easier.
Note: Ribbon, twine, and fabric scraps are addressed in detail in Lesson #12 of our free class, Get Organized.
Summary
When a scrap storage system is in place and functioning, there is less scrap guilt, more order, and you’ll use scraps to your advantage on a regular basis.
Your scrap dilemmas will be solved shortly. Congratulations! The results from your work are going to feel as good as they look!
If you're looking for information on how to store your 12" x 12" scrapbook papers, you can check out these two informative articles here and here.
This article is part of our free class called Get Organized. You can sign up and take the class free here.


