Shop Stamping and Tools!
Plus, Add 3 FREE Gifts to Your Cart! Details Here.
×
Store Inspiration Watch Creative Kindness More Resources


Working with stencils - advice needed

  • SandyJay
    I have some stencils and I have never worked with them. I tried using a brush and some acrylic paint, ink pad and my results are not that good. What kind of mediums are best? Sprays? Butters? The one stencil has a lot of detail and small areas. Any advice would be appreciated.
  • Lisn2cats
    I am a stencil-holic! Love them! I keep a plastic shoe bin of warm soapy water nearby and put used stencils in so I don't have to run to the sink every time to clean them. Anyway...

    Ink pads and stencils with
    • Fine details, I find using stencil brushes or Picket Fence Life-Changing brushes (or make up brushes) gets in the little nooks and crannies.
    • Large open areas, blending foams or makeup foams
    • For easy cleanup and kind of cool second sheets, put the used stencil on paper and wipe with a damp paper towel or cloth....or, if you're me, just spray the stencil and start wiping.

    Butters, pastes, acrylic paints, Nuvo drops, stickles, etc. - I find a palette knife or anything that scraps (old credit card, even sturdy cardboard) works. Be sure to soak or clean the stencil after use.

    Sprays are so much fun - I use an unused pizza box as my splatter box since I do mostly 12x12 LOs. Be sure to soak or clean the stencil after use.

    Have you tried layering your stencils? (Use a stencil with large openings as the base then stencil on top using one with more detail.)

    Bet there be other forum mixed media gurus (like Dawna and VIvian) who will make their way here and have even more tips and tricks!

  • SandyJay
    Thank you so much Lis!! I really appreciate your detailed advice! No, I haven't tried to layer….yet! Here is what I was working with..

    And what did you mean by second sheets? Like the imprint left when you lay your used stencil down? You have such great advice and tips!
  • PJD (Petra)
    You are doing great experimenting and trying different techniques. I too LOVE stencilling and still keep learning as I go along. Lis has already mentioned many great tips and tricks. And you might also want to consider the consistency and thickness of the medium you are trying to apply to your stencil, and the look/result you want to achieve.

    Applying paint / stencil butter etc to your stencil with a palette knife will make the image look smooth and crisp. If you stipple or pounce the paint on with a brush or sponge the image will look more textured. The pressure you use on application also affects your end result. With inks, a smaller brush used in a light, circular motion can produce subtle results and work great for blending colours together. Have you tried watering down your medium just a little? For example, that will make your opaque paint more translucent and softer. If your paint/ink is too watery it can bleed /smudge under the stencil - but even that can look really cool and effective, depending what you want the finished stencilled image to look like!

    There are also a lot of helpful videos and tutorials under the "More" section of this website that might be helpful and give you more answers. But the main thing is to experiment and HAVE FUN! Looking forward to seeing what you come up with and how you use your stencils!! Enjoy - Petra smiley emoji
  • Dawna.s Place
    Hi Sandy, Lis and Petra have given you lots of great advice. I think I have a love hate relationship with my stencils. I do love them, but they don't always cooperate with me! lol I mostly like using heavy mediums like texture paste or crackle paste with my stencils. I like the 3D effect that can be created when your paste is applied pretty thick. When you pull the stencil away from the thick paste, it really gives you a lot of definition, which I like. Just one more tip. When using "thin" mediums, tap your loaded brush on a piece of scratch paper before pouncing in your design. This will give you a much more even effect, and the thin mediums won't bleed under your stencil. Wishing you the best of luck, have fun playing and experimenting!
  • SandyJay
    Petra - thank you for your ideas! I will try watering down some paint and playing with that, and maybe get a brush and play with the ink pads. I didn't know to look at the more section to find helpful tips, thanks for the guidance, I will check that out!

    Dawna - thank you for the tip on the thinner mediums. I think I will be having the same love-hate relationship with stencils, LOL.

    Lis - the grungy look is really growing on me!!! It goes well with the way my son's bedroom looks!
  • Amysolovay
    Lots of fantastic advice here already! Thanks to everyone who already shared tips; I learned bunches from you all, and I am going to try your tips, too.

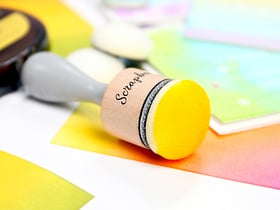
    A couple more you can try: Grab a reinker and some of these:


    Use the reinker to drop a few drops of ink onto one of the blending tools. If you want a watery effect, or if you want a lighter tonal of the ink color, or if you just want to make your ink go a little further, you can also dribble or spritz a tiny bit of water onto the ink blending tool -- but that's optional. Definitely don't overdo it with the water, though.

    If you try this method, it's wise to do as Dawna suggested and blot onto a piece of scratch paper first. If you skip that step, you are almost guaranteed to end up with ink underneath your stencil.

    I tend to fussy cut around stenciled images and adhere them to my main project, so that isn't a deal breaker for me; I just cut off the extra smudges. But that doesn't work for every project, because there are also cases when I need a clean image. When you need a super clean, non-smudgy stenciled image, your chances are better at achieving that after you've stamped multiple images and the ink on your blending tool is starting to dry out a bit, but isn't so dry that you can't keep stenciling.

    I have a stencil that I like to use for making journaling blocks, and smudges on that one drive me bonkers; I use the same method but wait until I've stenciled a lot of other images. Then when I'm close to running out of ink on the ink blending tool, I go ahead and do the journaling blocks. That makes for a faint image, which is fine in that case, because it's just lines that I use for making sure my journaling doesn't end up wonky. It doesn't need to be particularly visible on the finished project.

    If you use this method, it's wise to allocate a block of time to just stenciling, and do a whole bunch of stenciled images at once in the same color, so you can make the most of your ink and not waste bunches of ink. Doing that can also really speed up your scrapping / card making sessions later, because you will already have a bunch of images stenciled and dry and you can just use them without having to stop and stencil a bunch of stuff.

    You could also try the same thing using sponge brushes from the hardware store. My favorite sponge brushes for this have a bell-shaped sponge, but any of them can give interesting effects. With sponge brushes, if you're careful to thoroughly wash them before your ink or other media dry, you can reuse them bunches of times.

    Right now Tonic Studios has a weekend saver bundle that includes some stencil brushes I have been eyeing, but even at 50% off, they are pricey as compared against the cheapie hardware store sponge brushes I tend to use. I am really wondering if they are worth it. Has anybody here tried them? Scrapbook.com carries them too:

  • Dawna.s Place
    Hi Amy, I have a set of those brushes (only by Prima), but feel that they are very bulky and don't give quite the control of the smaller blending brushes like these: https://www.scrapbook.com/store/wfc-wft021.html. These work great especially for blending colors. You can find them all over the place, probably cheaper than these. Although, like you, I do love the bell shaped paint sponges that you can easily pounce in a design with. They are very cost effective and do a great job. But, if I'm blending, I like the blending brushes much better. Have you tried them?
  • Amysolovay
    Thanks for the info, Dawna. I really appreciate it!

    No, I haven't tried those -- thank you for the recommendation. I've seen a lot of different brands with similar tools, but haven't been able to wrap my head around how, exactly, people hold those or use them. I will look for a video; I'm sure someone must have posted one.

    I think those are new since I started scrapbooking, at least, I don't remember seeing them at the time I was actively paper crafting before. I started in 2006ish, but took a break from paper crafts circa around 2010ish until just recently. I didn't really want to, but had to give up on it at the time because my husband and I moved aboard a sailboat, and trying to do paper crafts aboard a rocking, salt watery sailboat is futile. Some of the tools I did take aboard with me ended up rusted and destroyed (But at least now I have pics worth scrapbooking as a result of that adventure...)

    Anyway, now that I'm back ashore and trying to get back into paper crafting, there are SO MANY NEW THINGS that it is really mind boggling. There is always so much more to learn! Thank you so much for steering me away from the brushes and guiding me towards the smaller blending brushes. I really appreciate your helpful suggestions!!!
  • Amysolovay
    SandyJay, I forgot to say in my earlier posts that I really like the stencil you chose for your first project! heart_eyes emoji It's such an interesting image, with so many creative possibilities for using it!

    But, as far as stenciled images go, that one is soooo complex. You might have an easier time getting the hang of stenciling if you start with a smaller, much simpler image like a heart, a square or an alphabet letter. An alphabet letter is especially good because if you make any mistakes with it, it will be instantly obvious to your eyes that there is a problem, and you can see where you are going wrong, and have some semblance of hope for figuring out how to improve.

    With a large abstract image like the one you started with, it is far less likely that you will be able to pinpoint problems and figure out how to fix them. But on the bright side, with an abstract image like that, any mistakes you make won't likely be so obvious to anyone else, either, so there is that! grin emoji
  • SandyJay
    Thank you Amy for the wonderful suggestions, the links, etc.! LOL. I know that stencil was the hard one to work with, but I couldn't help myself! It was so cool! Yes, I have easier sent old I will play with. I always do things the hard way (giggle). And welcome back ashore, I look forward to seeing your work and the story unfold as you post your projects!

    Dawna, thanks so much for your guidance!

    I think I need some blending brushes…I do have a re-inker, or at least a couple inks I had used diluted for spray before. (Wrinkled my paper, never used again). I am thinking you need good heavy paper/cardstock for this. I have mostly American Crafts or Bazzill.
  • Amysolovay
    re this: " I always do things the hard way (giggle). " Yes, I'm right there with you on that!

    re this: " I am thinking you need good heavy paper/cardstock for this." For big stenciled images, definitely. For significantly smaller stenciled images, as long as you go into it knowing that you might ruin some of them, you can get away with using whatever patterned paper or cardstock happens to look good at the moment.

    I think Strathmore Bristol board is the best for withstanding whatever abuse you give it when it comes to mixed media. It rarely warps or buckles unless you REALLY abuse it, and even then it is pretty forgiving. However, it is also plain white, so you either have to do some work making it a color, or live with the plain white. The most fun is trying different stencils on top of patterned paper, but you do have to be willing to lose some of it to failures.

    Even heavy cardstock will warp and buckle. I just, for the first time, tried some of Tim Holtz's Heavystock, and it warped and buckled. That was a little disappointing, but whatever. When that happens, I just stick the page under a massive stack of books and leave it there for awhile. It'll usually straighten out given enough pressure and time.

    I'm actually looking for a substitute for Strathmore bristol board. I was hoping Heavystock would be that, but it just isn't. The search continues! I will let you know if I find anything better.


  • Dawna.s Place
    Sandy and Amy, Here's a set of ink blending brushes, similar to mine, under $7.00; https://www.amazon.com/Crafting-Blending-Brush-Color-Crafter/dp/B07VB8S43L/ref=sr_1_11?crid=3NO2UNF5X6FLA&keywords=stencil+blending+brushes&qid=1646069889&sprefix=stencil+blending+brushes%2Caps%2C121&sr=8-11

    This style of ink blending tool came on the scene about 5 years or so ago. They were all the rage, and work wonderfully!

    Amy, can I ask what are you putting onto your cardstock that is making it buckle so bad?
  • Amysolovay
    Thanks for the link, Dawna! That looks like a great deal. And thanks also for the info. So they are not brand new, but definitely new to me.

    re "Amy, can I ask what are you putting onto your cardstock that is making it buckle so bad?"

    In my last stenciling session I did some designs that were just ink and some that were ink + a few drops of water. I found that I didn't get buckling when the inking tool was fairly dry, and that made a nice effect. When the tool was wetter with ink, that's when it warped and buckled. I didn't think I was being overly abusive since that particular paper is supposed to be for mixed media, but maybe I was expecting too much. Anyway, most of it came out usable after sticking it under a stack of books to straighten out.

    I used to sell collage art online back in around 2005 - 2010. At that time, I was using Strathmore Bristol board as the base for a lot of the art I was making. During part of that same time period, I was also teaching surface design classes to fashion design majors. We did a lot of hand dyeing, batiking and other hand techniques in the class. When class was done, I was left with bunches of leftover dye, so I used to paint with that. A lot of times I'd stick the leftover dye in a spray bottle and spray it all over the Bristol board. When subjected to that much liquid, of course the Bristol board would warp too, but in comparison it didn't warp much when you consider what it was subjected to.

    Then once it was dry, I'd collage a bunch of layers on top of it.

    All that, and it pretty much always ended up drying straight enough to be salable if I dried it under a few books (which, come to think of it, I always had to do the same thing with the art pieces I made in my printmaking classes in college, too).
  • Dawna.s Place
    @amysolovay Amy does your Strathmore come pre-gessoed? Or, did you apply a layer of gesso on your board or cardstock before stenciling or spraying your inks?
  • SandyJay
    Thanks for the link Dawna!

    What does “gesso” mean/do?
  • Dawna.s Place
    Your welcome Sandy. Let's see. Gesso is a "primer" that acts as an undercoat and sealer when using paints and other wet mediums. It comes in a variety of types like pure white which is good for canvases and chipboard pieces. It also comes in black which can be great from mixed media projects. Or lastly, it can come in clear. The clear however, has a fine grit to it making it feel a little bit like sand paper. The purpose of gesso is to primer a base that is going to be used with a lot of wet mediums. As a primer, paints "set on top" of the gesso, rather than soak into your base, so you get a truer color from paints. Used with 3D mixed media objects like metals, woods, etc., again it acts as a primer, but can also serve as a base coat when highlighting metals, resin pieces, chippies and other embellishments with waxes. When you use black as a base coat, you can layer on waxes over it, then the deep crevice's remain black while all your high spots reflect the wax color. You can get some pretty cool effects when used as a undercoat. Lastly since clear has a girt to it, it still acts as a primer, but also "grabs" sprays in a way that they too will sit on top of your paper, giving you a rich, truer color. All of these types can be used on paper so you can layer your colors in a much more vibrant way while also protecting your base paper from soaking up all the wetness from paints and sprays. I recommend white on white canvas work or chipboard pieces, black if you want to create a lot of depth with mixed metals, resin pieces or chippies; and, lastly clear for use on scrapbook papers when you are going to apply generous amounts of wet mediums. Normally it's not necessary for light stenciling, especially if you dab your stencil brush on a scratch paper first. That will prevent any initial "heavy blotting" on your page. But, it's highly recommended if your going to add several "wet" layers to paper or a project.

    Here's a sample of white gesso on a wood base with paints and waxes on top Notice that the colors are very vibrant.

    Here's a sample of black gesso on a wood base with copper waxes on top : Notice that the black gesso has more of a subdued effect with waxes. Although silver wax would have been much more vibrant because it has a better contrast than copper against the black.

    Very different effects. But, let me add that there's no sure fire way to prevent average (80-85lb.) cardstock or printed papers from warping. Your best bet is to use heavier papers (100-110 lb.) when using gesso and dry brush it on. You may still have some slight warpage, but it should be very minimal and will easily flatten out with the heavy book technique. I'm sure that's more than you really wanted to know about gesso! But, it is an essential tool especially when you start using lots of mediums. I hope this was helpful to you. Any questions, feel free to ask.
  • Amysolovay
    Good questions, Dawna. re "does your Strathmore come pre-gessoed? " not sure about that one way or the other. I took a look at the manufacturer's website, and they say nothing about it, at least not that I could find.

    https://www.strathmoreartist.com/draw-bristol.html

    And no, I haven't ever applied gesso to my paper crafts projects. It never even occurred to me. I read every word of your post above and found it all really interesting. LOVE the examples you posted, and they perfectly illustrate what you are explaining. Thanks for the lesson! I will give gesso a try with the Heavystock and see how it works out.
  • Dawna.s Place
    Your welcome Amy, wishing you the best. Enjoy experimenting!
  • SandyJay
    So for beginner, I am thinking of purchasing some clear gesso (I like the idea of spraying on it), some Blue Ribbon, or other color Tim Holtz spray ink…?oxide vs. regular?? and some paste I can add acrylic color to. I plan on working with stencils with light layers on my scrapbook pages. Does this sound like a good starting point?
  • Dawna.s Place
    @SandyJay let's move this conversation over to the Mixed Media Challenge thread here: https://www.scrapbook.com/forum/?m=topic&tid=253795&pid=-1
  • SandyJay
    Ok
  • Mr.E?
    I use a glue stick but with water and my fingers. You pick a piece off and smear it in-between your fingers and dip your finger in water until its a slick consistency then roll your fingers over the stencils edges. Does the butters work? I've never heard of them but I'm wondering if Vaseline, and a razor (scaping the opposite direction to the grain if you think of a face razor). Do you think that would do better possibly without messing up later paint layers. I'm looking to make massive stencils so would like a way to melt wax paper into clear plastic or something to save money.
    I'm looking for the cheapest thickest material for an electronic cutter to convert my svg files to stencils. I don't want to buy expensive smart paper so want one that can cut plastic wood sheet metal or at least cardboard... but