I love to organize. I also love paper, from notebook paper to colored cardstock to various papers. I especially love all the specialty papers available at Scrapbook.com (with new ones coming in all the time!). Hence, I have quite the collection of paper at my house.
Unfortunately, instead of the photographic memory I ordered when I was born, I ended up with an "If I can't see it, it doesn't exist" brain; I need to have most of my collection of scrapbook supplies out where I can see them so I can remember what I have and not spend frivolously. Below, I'll detail my experience and one storage method I came up with.
If you want to dig in deeper and need more help, make sure to read our comprehensive walk-through tutorial on how to store and organize your scrapbook paper.
This method I devised is just one option of course. Since the original publication of this article, many organizational products have been created and offered for sale in our store, and new methods are being introduced all the time.
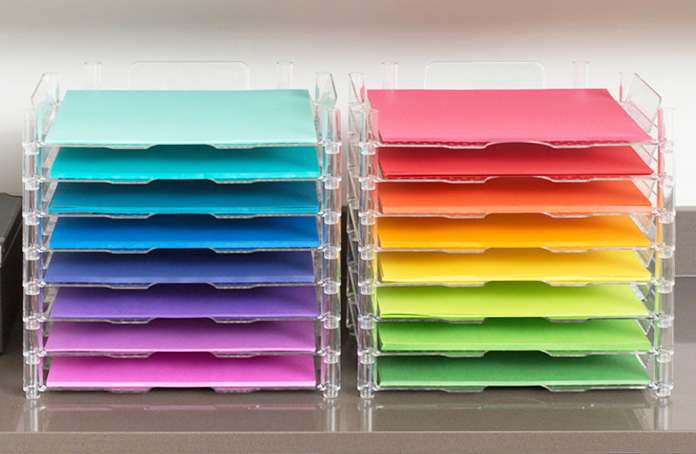
Some of the most popular and traditional storage options include the We R 12 x 12 Stackable Paper Storage Trays. There's just something tried and true about stackable paper trays that is appealing to me. You can devise a separation system for what colors, textures, weights, patterns, themes, etc. go on which trays, and since they're stackable, you can always add more.
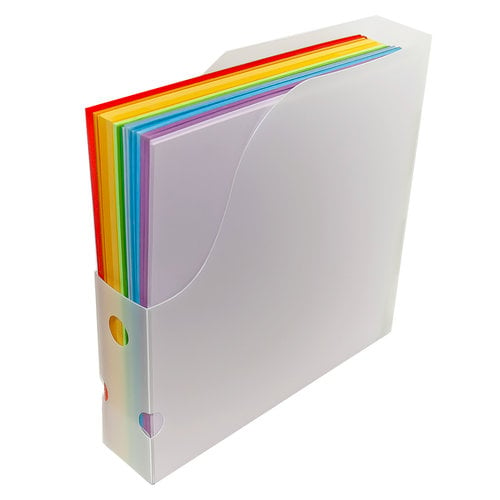
If horizontal just isn't your thing, you could also try vertical scrapbook paper storage holders as well. These have become quite popular and are relatively inexpensive too.
And, of course, there are lots of other storage products available as well. You can view more paper storage options here.
Jill Davis, Founder of Scrapbook.com details some incredible paper storage and other organizational ideas in her Class "Get Organized". I recommend taking the free class before deciding on a method that will work best for you. It's a treasure trove of information and ideas and most people would pay $50 for the education. It will save you a lot of time and money. At least for now, the class is totally free.
 OK, so now for my experience. One day I searched through my huge stack of patterned paper and realized I was lost. I had tons of wonderful paper it was all completely disorganized. I had invested over $100 in my paper collection and didn't even know what I had. I needed to use my investment and invest more wisely in the future.
What you will learn in this article are the easy techniques I employed for sorting and storing paper, cardstock and scrap paper. These techniques will allow you to see exactly what papers you have available. This, in turn, will allow you to get on with your scrapbooking instead of spending precious minutes, or hours, rummaging through your paper piles. These techniques also help in choosing appropriate papers for your layouts.
OK, so here's my method:
Note: Set aside 3 - 4 hours for this first project. You'll be glad you did.
First, label the manila file folders with color names in rainbow order. Write each name on two folders (one for cardstock and one for patterned paper).
Add more folders if you have another color you know you have a lot of, if you want to further sort your blues or greens, or if you have a lot of holiday or multicolored papers, etc.
Second, place one manila folder in each hanging folder.
Third, after your folders are labeled, sort your cardstock into the appropriate manila folders.
Last, sort your patterned papers into the coordinating folders as well. Now you should have all your papers (both plain cardstock and patterned) organized by color or theme into manila folders in a hanging file (or two or three files). So, stand up, stretch, and get a big drink of water, you're doing great and the fun part is about to begin!
Note: Standard rainbow order is white, cream, pink, red, orange, yellow, green, blue, purple, brown, and black.
Here's where you learn those organized shopper skills.
Take each piece of paper and find one or two coordinating colors of cardstock from your files. If you can't find cardstock to match, put the paper in a sheet protector and place it in Binder #1. This is the binder you will consult the next time you shop to find coordinating cardstock for all those unmatched papers.
Once you have matched a piece of patterned paper with enough cardstock for a one or two-page layout, place that collection into a page protector and put it into Binder #2. Repeat this process with each of your patterned papers. I started with the pinks and went through each color folder. I filled three 3" D-ring binders, and had another 1" binder full of papers with no cardstock. When you are finished, your binder(s) will be a rainbow display of perfectly matched papers, all ready and waiting for your wonderful photos!
Tip: When shopping in the future, every time you add a piece of patterned paper to your shopping cart, make sure to add enough coordinating cardstock to mat your photos and/or use as your background so that you're never caught again with paper you can't use!
Allowing enough paper for a two-page layout is always a smart way to shop. Also, make sure you have enough of each pattern to complete your future pages, since paper collections are sometimes are discontinued.
Now let's address some successful ideas for storing your paper scraps!
First, a quick cleanup bin (or drawer) in a scrapbook workplace is a must. The success of this bin comes from the regular sorting of the contents into permanent storage. An effective permanent storage container is a file crate with hanging file folders. Each folder is labeled with tabs in rainbow order (be sure to make one folder for solid colors and one for decorative papers). Scraps can be filed quickly into the appropriate folder. This method works best with scraps larger than 3" x 5".
For smaller scrap storage use one-gallon plastic bags for each color, then file the bags in rainbow order in a file crate or storage container.
Keep your scrap bins close to you as you work, and to have a place to store them when you're not scrapbooking. Look in them often for paper you can use for your matting so that you don't have to cut a new sheet of paper or cardstock needlessly. Part of the fun of scrapbooking is making good use of all your equipment and supplies!
I hope you will feel motivated to go through your paper collection to see what you have and what you need to add to it in order to use it in your scrapbooks. I love all the different papers available, and although I enjoy my rainbow display in my binders, I'd much rather have my precious photos displayed beautifully on those papers, for all my family and friends to enjoy.
If you enjoyed this piece, and want to learn more, check out the following articles:
Everything You Need to Know About Paper
How to Organize & Store Your Scrapbook Paper
How to Sort and Store Your Scrapbook Paper Scraps