


Every part of creating a scrapbook layout is a special process that comes with its own challenges, techniques, and choices to be made. From choosing the photos to choosing the supplies, to titling or even making the memories in the first place, creating layouts is an experience all in its own!
Sometimes, while finishing a layout, we want to add special flourishes that are unique and thoughtful, but the ideas don't come. No need to fret! Here are a variety of creative tips and ideas from Lisa Andrews, scrapbooking-pro.
Below, you'll find eight unique ways to embellish your layouts, so each layout you create is as individual as the remarkable story it has to tell!
Note: All of the items that Lisa Andrews used can be found at the bottom of this article. Also, the Embellishments Section of the Scrapbook.com store has all of the beautiful, unforgettable details you need (and more!) for your crafting needs.
1. Using Journaling Cards as Embellishments

Journaling cards generally aren't the first thing that pops into your mind when you think "embellishments!" However, they actually do make pretty perfect embellishments, and for a few reasons. Usually purchased in packs or kits, journaling cards are typically designed as a set, thus go together flawlessly. Score! No matter which journaling cards you mix and match within the same set, the "look" is going to be seamless. This is one less decision you have to make (do these colors look good together? What about these patterns? So on and so forth) and will ultimately save you time. Plus, journaling cards are larger than your typical embellishment, so you have less "room to fill."
How do you use journaling cards as embellishments? All you have to do is spread out the pack, kit, or card options you have, then choose the one that stands out to you - whether it's because of the sweet sentiment or the pattern, choose the one that is screaming "Pick me! Pick me!" Don't question your choice, just go with the flow!
After that, choose 2-3 more (or however many you have room for) that complement your stand-out card of choice. Paste them to your layout, and voila - journaling cards have become the icing on the cake.
2. Using Handwriting as an Embellishment
 Your handwriting, whether you are fond of it or wish it were different, is unique to YOU and will give your layouts a distinctive flair that only you can give. How special is that? This form of embellishing is extremely easy since all you need is your hand, your story, and a marker or a pen! Plus, it can be a fun way to get the family involved with your memory keeping, if that interests you (have your children, husband, grandchildren, or friends write a blurb on one of their photos)!
Here, Lisa printed an 8.5" x 11" photograph. Over the big, empty blue sky space, she then used a pen to write the story of that photograph atop. Not only is it eye-catching as a piece of creative expression, but it's also functional, in that a very specific memory will now live on!
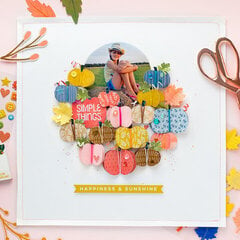
3. Embellish with Stickers
 It's no secret. We scrappers love stickers - and sometimes we have so many to choose from, that not only is our stash full of options to express our creativity, but it also might need some gleaning out (to make room for more, of course!). An excellent method for embellishing that also gives you room for new creative-goodness is... stickers!
Lisa loves to use stickers as an embellishment and has a few creative ideas on how to incorporate them into your layouts.
First, she suggests using a background page that has a pattern you can "fill" up, such as the layout she created above. With its blocky motif, there are tons of empty spaces to fill in and lines to work off of, giving you automatic, no fuss "placements" for your stickers.
Another idea she shares, is putting stickers atop your photographs to give hints or reminders about events that were taking place when the photo was snapped.
The third idea she shares is to use bold alpha stickers to help tell your story, but also embellish. You can create a title for your layout (hint: we have a fun title idea area here) or you can use descriptive words to help share your story.
 For example, if your layout is all about a camping trip, you might spell out the words "S'MORES, CAMPFIRE, or BUG SPRAY" depending on funny and heart warming situations you and yours encountered during your adventure outdoors!
Note: Don't forget about the wide variety of stickers to choose from nowadays! From standard stickers to ones with finishes, chipboard, rub-ons, puffy stickers, epoxy, and more! The options are endless.
4. Wood Veneers as an Embellishment

Wood veneers are another appealing option for your layouts. Leaving them plain (or unpainted) will give your layouts a stylized effect, depending on your selected "supporting cast" of creative materials. For example, using cornflower blues and lace, wood veneers will finish off that shabby chic look you were going for.
Lisa painted her favorite wood veneers, seen in the photo above, to create a colorfully jubilant beach-day layout! She used Heidi Swapp Color Shine Spray Mists to paint hers, but any acrylic paints or markers will work to personalize the wood veneers you'd like to use.
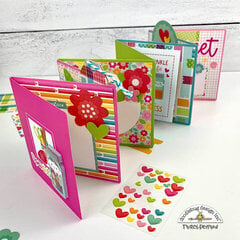
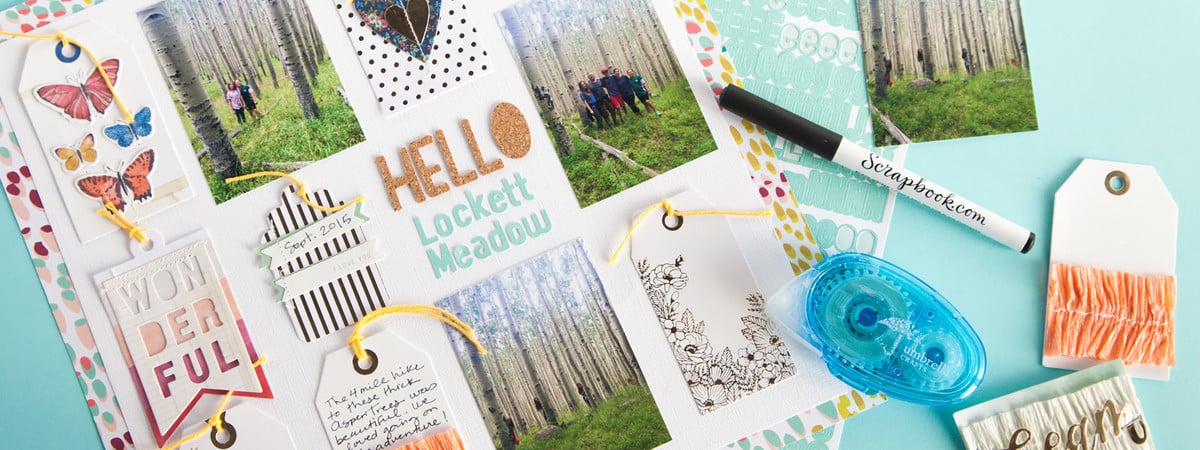
5. Embellish with Journaling Tags
 Similar to journaling cards, using journaling tags as centerpieces in your layout is a simple, yet surprisingly effective way to give your design an original feel. Tags oftentimes are designed with empty spaces for writing, so this gives you more room to get your stories told, which Lisa did on one of the tags in her layout above.
If you'd like your picture to do the talking, tags are beautiful as-is, especially because many of them either have pre-printed designs or patterns on one side, or you can make them your own by adding lace, stickers, buttons, and more. If all else fails, layering tags is another way to create enjoyable aesthetics that your scrapbook-audiences are sure to love.
Plus, just like journaling cards, journaling tags often come in sets and kits, so they're sure to "work" together!
6. Using 6 x 6 Paper Pads for Embellishing
 Perhaps the most thrifty of the eight ideas (besides, perhaps, the handwriting), using your 6 x 6 paper pads is an easy way to take your layouts one step further. Nearly all of us have cute little 6 x 6 paper pads on hand, and if you do not, they aren't pricey and there are hundreds, if not thousands of options to choose from. Plus, as crafters, we oftentimes feel bad about wasting leftovers from 12 x 12 papers, or using an entire 12 x 12 for something "small," such as as an embellishment. With 6 x 6 pads, it's easier to feel less guilty about the throwaway scraps! Bonus!
The sky is the limit when it comes to how to use your 6 x 6 papers to embellish, but Lisa has a couple ideas right off the bat on what you can do today.
Start by flipping through your 6 x 6 pad, looking at all of the paper options within. Carefully choose 3-5 papers that speak to you, that also complement each other (more often than not, this won't be a problem, as packs are designed with cohesiveness in mind).
Next, cut out a basic shape by either die cutting or fussy cutting. We'll use a circle as an example. When you cut the circle out of your 6 x 6 paper, you'll be left with a "frame" (the paper left over from where the hole was cut out). Set that aside and grab a different 6 x 6 patterned paper. Repeat, cut a circle out of that patterned paper. Next, set both papers down side by side and swap the circles so they are in each other's "frames"! You've created a fun design that takes little to no effort, and looks very original! Try this with any basic shape you'd like, or try them all!
Also, check out these if you're looking for stunning dies in all of the basic shapes you need, so if this method of embellishing really speaks to you, their dies will be a huge time-saver!
7. Embellish with Sequins
 Gets glitzy and glamorous with sequins! There's the simple way - glue sequins on with your favorite liquid adhesive. But Lisa has a more intricate way to share with you that is totally worth the time and effort. Shaker pockets. Your layout instantly becomes interactive and full of sparkly amusement!
To create the layout above, Lisa traced a dinner plate on her 12 x 12 page, created a template, then cut "pie" shapes of her photos, page protectors (to convert into shakers), and other patterned papers to fill the circle.
Brilliant!
8. Washi Tape as an Embellishment
 At the end of the day, it's hard to go wrong with washi. Inexpensive, beautiful, and more-than-slightly addicting, there's a washi tape that suits every style, and their uses are vast.
Lisa suggests using strips of paper on your layout (like pictured above), then using washi to decorate those strips. Fill the paper strips with either alpha sticker titles, journaling, or other embellishments as you wish. Then, cut strips of washi, fold them in half (sticky side to sticky side), and adhere them to the paper strip, neatly, creating playful tabs and banners. Cut dove-tails on the ends of your washi too, or even leave some folded loosely to create a ribbon-effect. By switching between dove-tails, ribbon folds, and straight-edge folds, you'll soon have a variety of mini banners in the works.
If you like to play and experiment, embellishing with washi is a fantastic option. Cut and fold different widths, lengths, and more.
We hope that you enjoyed these 8 unique ways to get the most out of your scrapbooking supplies through embellishing!